I had just the opposite problem. Mine were too loose, but that was an easy remedy.
You are using an out of date browser. It may not display this or other websites correctly.
You should upgrade or use an alternative browser.
You should upgrade or use an alternative browser.
1976 Superior 54XL Restoration Log
- Thread starter Jean-Marc Dugas
- Start date
Jean-Marc Dugas
PCS Member
Installed the hardware for the FW Model 1 Cot bar. I now have the option to carry a Model 30 or Model 28 cot.
Of course there has to be issues.....I cannot find the longer cot bar. This one will work with my incubator cot, but the handle on this one ends at the foot of the Model 30 making it a little hard to reach. I may have given it to someone or misplaced it.
When I started in EMS we always had the option of using different cots depending on the situation, so this arrangement is nothing new or unusual.
The foot of the Model 30 is also exactly 12 inches from the door as required by the 1984 New Brunswick Standards for Ambulance Services.
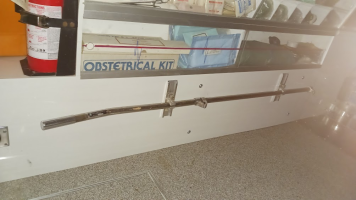
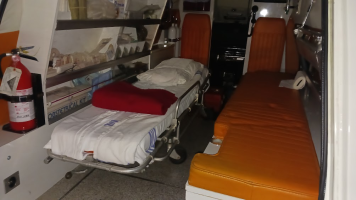


I should have a caddy bar in the rack. If you can't find yours.
Jean-Marc Dugas
PCS Member
Spring 2025 update.
The car spent the winter in a nice heated underground garage just a few kilometers from here. The first two items on my list were to look at the cruise control and at the rotating knocking noise coming from underneath that started not long before I parked the car last fall.
First hick-up, both batteries were dead. My fault, I should have disconnected them, not only rely on the main battery switch. So I now have 2 new batteries.
I took the car to a local shop to see if they could pinpoint where the noise was coming from. They were not able to pinpoint the source, but fixed a loose exhaust bracket, but everything else looked solid. They recommended that I go to to a shop that specialize in drivetrain to make sure that everything is indeed good.
The rotating knocking noise (toc - toc - toc) is from solid metal, not sheet metal (It is hard to explain, but I am sure that many know what I mean). The noise is there at low speed only. We went to the drivetrain specialist this week. the opened-up and inspected the differential and found nothing wrong there. this was a great opportunity to clean it up, replace the gear oil, etc. The rear axles were solid, so no issues with the bearings. They removed the driveshaft and it was in like new shape (I had the U-Joints, center bearing, etc. all replaced last year). Both ends of the driveshaft showed no sign of wear.
They however noticed two things. First the transmission mount is showing signs of wear. It is still good, but I will replace it anyways. Second, the transmission output shaft seems to have excessive play. From what they could see it looks like the bearing at the back of the transmission may have seen better days. However, they are not a transmission shop so this is where their investigation stopped.
The good news is that the driveshaft and the rear end are in tip top shape. I have an appointment at a transmission shop in about a month. This will be a good opportunity to replace the transmission mount, change the oil and replace the leaky transmission oil pan gasket.
Jean-Marc Dugas
PCS Member
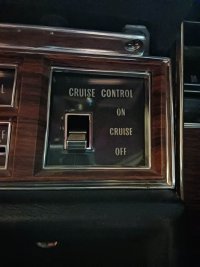
Now in regards to the cruise control, I received a refurbished transducer and dash switch assembly. The transducer replacement was easy, however one must not be too quick in rejoicing when thinks are going well.......
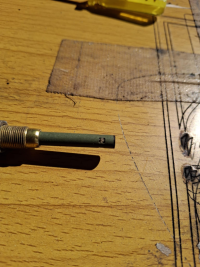
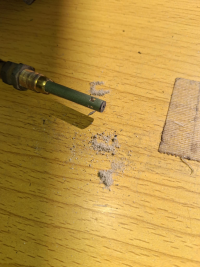
While testing the switch assembly, one of the small plastic shaft holding the switch in place snapped. Great! I now have two dash switch assemblies that are broken. I am going to disassemble the switch to see how easy it would be to drill out a hole where the shaft was and replace it with a metal pin. Another option would be to swap this part with the rocker from the antenna up/down switch. I do not use this switch because I have a replacement antenna which does not have the Cadillac up/down functionality.
As you can see from the pictures below, the brittle shaft broke on the side of the switch where the plunger is located. There is a spring that goes from the back of the plunger inside the rocker. My guess is that the constant tension on that side of the switch over the last 48 years got the best of the plastic shaft.
Dash Switch Assembly
Broken shaft
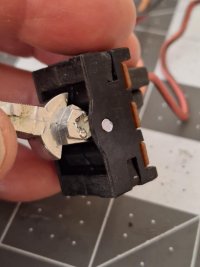
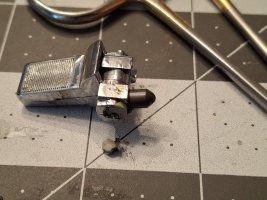
While testing the switch assembly, one of the small plastic shaft holding the switch in place snapped. Great! I now have two dash switch assemblies that are broken. I am going to disassemble the switch to see how easy it would be to drill out a hole where the shaft was and replace it with a metal pin. Another option would be to swap this part with the rocker from the antenna up/down switch. I do not use this switch because I have a replacement antenna which does not have the Cadillac up/down functionality.
As you can see from the pictures below, the brittle shaft broke on the side of the switch where the plunger is located. There is a spring that goes from the back of the plunger inside the rocker. My guess is that the constant tension on that side of the switch over the last 48 years got the best of the plastic shaft.
Dash Switch Assembly

Broken shaft


A small hole threw both of the switch and broken shaft the size of a stiff wire should work. Or You could just leave the drill bit in. Old plastic is a problem. Fight it on a lot of them.
Jean-Marc Dugas
PCS Member
I was thinking of super gluing it back in place, drill a small hole the size of a paper clip and then place the paperclip cut to size, but I like the idea of leaving the drill in the switch. That would probably be the safest option.A small hole threw both of the switch and broken shaft the size of a stiff wire should work. Or You could just leave the drill bit in. Old plastic is a problem. Fight it on a lot of them.
Find someone to 3D print a new part. If yours is broken, so are many others. You could probably recoup some of the costs by selling spares on eBay to others with the same problem.
Jean-Marc Dugas
PCS Member
I was able to fix the switch as described above and got the cruise control operational.......well kinda......
When the cruise engages, the car speeds up at a constant acceleration. This is probably an issue of vacuum somewhere in the system. Something to troubleshoot next week.
When the cruise engages, the car speeds up at a constant acceleration. This is probably an issue of vacuum somewhere in the system. Something to troubleshoot next week.
Jean-Marc Dugas
PCS Member
I was able to fix the switch as described above and got the cruise control operational.......well kinda......
When the cruise engages, the car speeds up at a constant acceleration. This is probably an issue of vacuum somewhere in the system. Something to troubleshoot next week.
Any suggestions?
When the cruise engages, the car speeds up at a constant acceleration. This is probably an issue of vacuum somewhere in the system. Something to troubleshoot next week.
Any suggestions?
A vacuum leak wouldn't cause the symptoms that you describe. Most likely the transducer isn't responding to the speed sensor within it. Check the speedometer cable where it attaches to the cruise control head. If your speedometer is working, then the cables are okay, so the problem is likely located inside the transducer itself. Check the factory service manual for other hints and suggestions.
Is there a resume switch on yours sounds like it is stuck closed.
Jean-Marc Dugas
PCS Member
It is a 3 wire non resume cruise.Is there a resume switch on yours sounds like it is stuck closed.
Jean-Marc Dugas
PCS Member
Will there cleaning procedure might need tweeked. But it great when a plan comes togather. I would not have thought to look there for that.
Jean-Marc Dugas
PCS Member
I took the time to replace all of the hoses, bench test all of the electrical components which left me with only one place to look. You got to loft your hat to the folks that thought about how to make these transducers work. It is quite something when you think about it.Will there cleaning procedure might need tweeked. But it great when a plan comes togather. I would not have thought to look there for that.
I had to adjust the tube a little as it was still picking up a little bit of speed after I put everything back together, but I think I have it dialed in pretty well now.
Jean-Marc Dugas
PCS Member
It has been a while since I updated this thread. I had the car at the shop a couple of weeks ago for a thorough inspection ahead of the Provincial Motor Vehicle Inspection. Just want to make sure that I do not get a red rejection sticker.
Jean-Marc Dugas
PCS Member
One thing to remember with this car, at almost 50 years old, is that she is no spring chicken, so I expected the list to be relatively long. Nothing jumped out as terrible, but it all adds up regardless.
So, I ended up replacing the following items:
Front Callipers, brake pads, and rubber hoses.
Rear brake shoes, springs, and cylinders
Exhaust pipe and muffler from the Y pipe back
Motor mounts (I purchased new motor mounts when I replaced the transmission mount earlier this year. This was the opportunity to replace them since the car was in the shop).
Still to be replaced:
Centre Link and tires.. This may have to wait until the spring, my ambulance budget is kinda in the red right now lol
One thing I learned when I was working on my 67 Pontiac is that when you replace parts on one of the car system, thinks are bound to happen. Everything has been working in harmony for the past 50 years, so when you tinker with a part, you upset the balance.
So.....after replacing all of the brake components, bleeding the lines, and replacing the fluid, the mechanic pressed on the brake pedal, and everything was fine until it went right to the floor. The master cylinder gave up! The brake system harmony was broken. It is not 100% surprising as it has been leaking for the past several years. Better have it fail at the shop than on the road.
Hopefully, the new master cylinder will be here early next week, and I can get the car for the next weekend's shows. I am looking forward to see how it drives with all of these new parts!
Philip Scanio
PCS Member / Super Site Supporter
I feel your pain!
You get all the worn parts swapped and it will go along for another 50 years.


