
Till you can find that piece of dash fill the holes with the push in plastic panel holders.

You are using an out of date browser. It may not display this or other websites correctly.
You should upgrade or use an alternative browser.
You should upgrade or use an alternative browser.
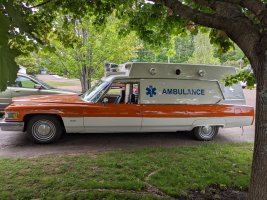
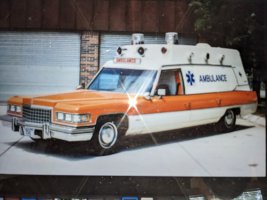
1976 Superior 54XL Restoration Log
- Thread starter Jean-Marc Dugas
- Start date
Jean-Marc Dugas
PCS Member
Operation Rear bumper continues. This evening I was able to remove the driver's side rear bumper. Not knowing what I was doing it took about 2 hours. Hopefully, the other half will come off a little quicker.
The inside of the bumper does not look too bad, but I will still clean it and paint it the same as I did with the ends. The metal bracket that holds the tail lights is getting rusty, so this may be the excuse I needed to get one of those benchtop sandblasting cabinets....
Talking about sandblasting, would it be safe to use one of those gravity-fed sandblasting guns to clean the inside of the bumper before painting it?
Not unless you want to double tape them. Same with a blast cabinet. The best way is to get a tub and one of the rust removers and just cover them with it. Put a lid over it to slow down the evaporation. It will not bother the chrome but will remove any rust. Both sides. Then prime and paint.
Jean-Marc Dugas
PCS Member
This evening I removed the center plate as well as the passenger side rear bumper section. Now that I have done it once on the driver's side this took me only about 1/2 hour instead of 2.
I think that I will be taking the bumpers to the welding shop to have the far-end brackets reinforced. I was able to drive the screwdriver right through the rusted metal. The good news is that the rust is only affecting the brackets, so no work on the bumper itself needs to be done. Both pieces are soaking in degreaser overnight and I will apply some rust converter tomorrow and hopefully have them to the welding shop early next week.


I think that I will be taking the bumpers to the welding shop to have the far-end brackets reinforced. I was able to drive the screwdriver right through the rusted metal. The good news is that the rust is only affecting the brackets, so no work on the bumper itself needs to be done. Both pieces are soaking in degreaser overnight and I will apply some rust converter tomorrow and hopefully have them to the welding shop early next week.
Jean-Marc Dugas
PCS Member
Very slow week restoration-wise, but I may have a lead on that bumper center piece. Hopefully, it will work out. I lost out on getting my hands on an FW Model #29 Roll In All Level Ambulance Cot manufactured in 1981. Another one will pop up somewhere eventually.
The design of the car with the canceled rear side windows really makes it sound like a tin can. I applied butyl sound deadener sheets to the 3 canceled windows. Hopefully, that will make a difference with the sound level in the back of the car.


The design of the car with the canceled rear side windows really makes it sound like a tin can. I applied butyl sound deadener sheets to the 3 canceled windows. Hopefully, that will make a difference with the sound level in the back of the car.
To repair the ends you will most likely end up replating them. But it would be best to wait on the converter till you get them back. It doesn't remove rust only stabilize it.
Tim Prieur
PCS Member
J-M, I went through all my stuff, and looks like the center piece went to the recycler along with the bumper. Sorry about that.
Jean-Marc Dugas
PCS Member
Yesterday I was planning on reinstalling all of the trim on the doors s on top of the quarter panels. Well, I decided not to do the driver and passenger doors yet since I will most likely need to replace the felt beltline weatherstrip. Something else to source.
I noticed a dent on the trim that goes on the top of the spare tire door. Fixing this took a few hours, so only the driver side trim (minus the drivers door was installed).


Today was a little colder, so I decided not to work on the passenger side trim because I want the sealer I use to flow in the cracks as well as possible, so I decided to tackle the shoreline. I took the faceplate to Kent (our local version of Home Depot) to get a 20 Amp electrical socket and plug. It is not the same exact pin pattern as the original, but it will have to do.
I may put some caulking on the inside between the electrical box and the quarter panel It looks like this is a pretty big gap where water come in.
Finally, I tested the inverter by turning it on with the engine running for about 15 minutes. I do not have a proper multimeter for 120 volts, but I was able to confirm that there were no shorts, that power was reaching the shoreline socket, and all of this without the inverter catching on fire or smoking. The inverter gets turned on / off via two push-button switches located in the center console beside the siren. All seems to work as intended.


I noticed a dent on the trim that goes on the top of the spare tire door. Fixing this took a few hours, so only the driver side trim (minus the drivers door was installed).
Today was a little colder, so I decided not to work on the passenger side trim because I want the sealer I use to flow in the cracks as well as possible, so I decided to tackle the shoreline. I took the faceplate to Kent (our local version of Home Depot) to get a 20 Amp electrical socket and plug. It is not the same exact pin pattern as the original, but it will have to do.
I may put some caulking on the inside between the electrical box and the quarter panel It looks like this is a pretty big gap where water come in.
Finally, I tested the inverter by turning it on with the engine running for about 15 minutes. I do not have a proper multimeter for 120 volts, but I was able to confirm that there were no shorts, that power was reaching the shoreline socket, and all of this without the inverter catching on fire or smoking. The inverter gets turned on / off via two push-button switches located in the center console beside the siren. All seems to work as intended.
Jean-Marc Dugas
PCS Member


An L6-20 receptacle is a 220-volt and 20 amp. What was the original receptacle and can you possibly post a picture of it? I wouldn't want to be working outside with a 220-volt 20 amp system unless it was protected with a ground fault device. Even a 110-volt system can give you a heck of a shock. If you are standing on any dampness you will be the grounding rod to earth. Voltage doesn't kill, but amperage definitely will. I would be more inclined to add a ground fault circuit breaker to the car if you are planning on having it operational.
That would be a twist lock reciver. For power out. Shore power would be a male plug for power in. The inverter only converts 12 volts dc in to 120 volts ac out. Those with shore normaly had a inverter to drop 120 to 12 DC to power things in the rig and charge battries when parked.
Jean-Marc Dugas
PCS Member
My mistake. Not a shoreline, but power out. I find it odd that it does not have a shoreline to charge the car batteries and medical equipment.That would be a twist lock reciver. For power out. Shore power would be a male plug for power in. The inverter only converts 12 volts dc in to 120 volts ac out. Those with shore normaly had a inverter to drop 120 to 12 DC to power things in the rig and charge battries when parkeMy mistaked.
Jean-Marc Dugas
PCS Member
Not as good as new, but better than it was. 5 or 6 hours of sanding and buffing that I will never get back. Hopefully, the other one will go faster!


The reason that it took so long to polish the rocker moldings is that they were flash chromed when manufactured. The chrome does dull after years, and the only way to get a shine back is to remove the chrome and polish the stainless steel. Stainless steel will oxidize with time, so make sure to put a good layer of wax or ceramic coating on it to preserve the gloss that you have worked so long to recover.
But it looks good.
Abe Bush
PCS Member
The original owner must have been on a budget when checking boxes of the order form at their local Superior dealership back in 1975. Too bad their salesman wasn't able to talk them into it.My mistake. Not a shoreline, but power out. I find it odd that it does not have a shoreline to charge the car batteries and medical equipment.
Jean-Marc Dugas
PCS Member
Productive week. I actually achieved my 3 goals this week.
Goal #1
First I reinstalled the passenger side loading door window. I took the window seal off the window. I started by cleaning the window seal with soap and water and removing as much of the dried sealant as possible. Next, I used the pressure washer to remove any loose sealant that I missed, and finally, I went with a pick tool to remove dried sealant leftover on the inside of the window seal. Before reinstalling the window, I scrubbed the metal where the window sits, treated it with rust converter, and painted it with rust paint. There was only minimal rust in that area, but since it was exposed, why not. I replaced the old strip of wood that sits between the door and the bottom of the window with a 1/4" plywood strip that I treated with wood sealant in case it gets wet. Finally, I polished the interior window trim and made sure I had all of the pieces lined up and ready for the install.
I applied fresh urethane to the inside of the window seal and to the areas of the door that are in contact with the window seal. Looks good and as a bonus, I did not get the urethane all over myself, the window, or the car.


Goal #2
The second thing I wanted to do was to replace the vinyl inserts located above the rear loading door, on the side of the car, and down the A posts. I got 100' of black vinyl insert from the local RV store earlier this week and installed that today. It is a small detail, but it makes the car look smarter.


Goal #3
Finally, I wanted to see what the Vinyl lettering looked like on the car. I watched a couple of YouTube videos on how to apply decals to a car and voila, done!!

It will have to be done over, my vinyl decals skills are, let's say not up to par. There are quite a few bubbles I could not get to go away. The original letters were a little bigger, but I think that this will do just fine. When I get the Star of Life I'll get the sign shop to install the decals for me.
Lastly, I received the pyramid shape rubberized floor mats. I have put it aside for when I tackle the interior.


Goal #1
First I reinstalled the passenger side loading door window. I took the window seal off the window. I started by cleaning the window seal with soap and water and removing as much of the dried sealant as possible. Next, I used the pressure washer to remove any loose sealant that I missed, and finally, I went with a pick tool to remove dried sealant leftover on the inside of the window seal. Before reinstalling the window, I scrubbed the metal where the window sits, treated it with rust converter, and painted it with rust paint. There was only minimal rust in that area, but since it was exposed, why not. I replaced the old strip of wood that sits between the door and the bottom of the window with a 1/4" plywood strip that I treated with wood sealant in case it gets wet. Finally, I polished the interior window trim and made sure I had all of the pieces lined up and ready for the install.
I applied fresh urethane to the inside of the window seal and to the areas of the door that are in contact with the window seal. Looks good and as a bonus, I did not get the urethane all over myself, the window, or the car.
Goal #2
The second thing I wanted to do was to replace the vinyl inserts located above the rear loading door, on the side of the car, and down the A posts. I got 100' of black vinyl insert from the local RV store earlier this week and installed that today. It is a small detail, but it makes the car look smarter.
Goal #3
Finally, I wanted to see what the Vinyl lettering looked like on the car. I watched a couple of YouTube videos on how to apply decals to a car and voila, done!!
It will have to be done over, my vinyl decals skills are, let's say not up to par. There are quite a few bubbles I could not get to go away. The original letters were a little bigger, but I think that this will do just fine. When I get the Star of Life I'll get the sign shop to install the decals for me.
Lastly, I received the pyramid shape rubberized floor mats. I have put it aside for when I tackle the interior.
Jean-Marc Dugas
PCS Member
I applied the SOL decal to the rear loading door two days ago now. There are still bubbles in the vinyl. I may remove it and install a new one using the soapy water technique. I applied this SOL and the word AMBULANCE using the dry technique.

This evening, I finished lining up the vinyl for the driver side and applied the SOL using the soapy water technique. It worked way better for me than applying it dry. I will be using soap and water from now on. I ran out of daylight so the AMBULANCE will have to wait until tomorrow.


This evening, I finished lining up the vinyl for the driver side and applied the SOL using the soapy water technique. It worked way better for me than applying it dry. I will be using soap and water from now on. I ran out of daylight so the AMBULANCE will have to wait until tomorrow.
Jean-Marc Dugas
PCS Member

Jean-Marc Dugas
PCS Member
Productive day today.
I finished reinstalling the driver-side belt trim. The piece on the spare tire door is not in line with the others, and that is because the door needs to be adjusted upwards. this will also take care of proper alining the base of the window trim so that it lines up as well.


Next I reinstalled the moldings on top of the door outer skins and the outer window belt strip. They have to be installed together. I will need new window belt strips as well as window channels.


Finally, I started to work on reinstalling the passenger side door card. Since I was working on the door, I lubricated all of the moving parts controlling the raising and lowering of the window. What a difference it makes!! I also cleaned the dirt that was left inside the door and made sure that the drain holes are free of debris.

I then went to get the door card and cleaned it up for the installation. This is where things came to a stop. I closed the passenger side door to get by and was not able to unlock it. Luckily this occurred before I placed the door card back on. This way I have easy access to the mechanism. A job for tomorrow if it does not rain.

I finished reinstalling the driver-side belt trim. The piece on the spare tire door is not in line with the others, and that is because the door needs to be adjusted upwards. this will also take care of proper alining the base of the window trim so that it lines up as well.
Next I reinstalled the moldings on top of the door outer skins and the outer window belt strip. They have to be installed together. I will need new window belt strips as well as window channels.
Finally, I started to work on reinstalling the passenger side door card. Since I was working on the door, I lubricated all of the moving parts controlling the raising and lowering of the window. What a difference it makes!! I also cleaned the dirt that was left inside the door and made sure that the drain holes are free of debris.
I then went to get the door card and cleaned it up for the installation. This is where things came to a stop. I closed the passenger side door to get by and was not able to unlock it. Luckily this occurred before I placed the door card back on. This way I have easy access to the mechanism. A job for tomorrow if it does not rain.