72 S&S Three-Way door questions

Dan Comoss

PCS Member
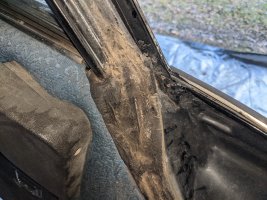
I have a few questions about replacing the door seals since mine, I believe are original, extremely brittle and chunks are missing. I want to replace them to try and prevent water from entering the interior and possibly help with some of the road hiss.
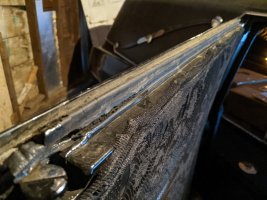
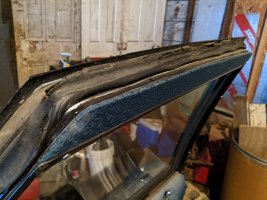
PXL_20201222_212622468.jpg
PXL_20201222_212711791.jpg

I've been searching and found a lot of choices at USA Auto Parts in WV. Since my seals are really bad I'm not sure where to begin. I'm also new to Cadillac's and coaches in general so I'm trying to hit the ground running trying to learn as I go. I guess I need someone to check my research so I don't order the wrong stuff again.

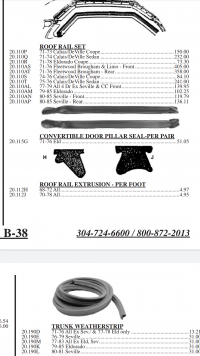
I believe would need to order the front door seals for the 71-76 Fleetwood Brougham Limo and maybe enough extruded seal for the roof rail for the front and rear doors? Maybe just enough extrusion for the rear door? Across the top bottom and down the back of the rear door since the front door seal seals the front of the rear door?
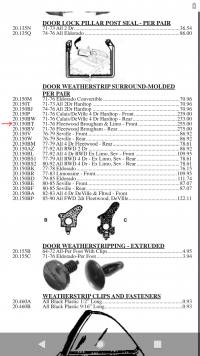
Screenshot_20201223-070138~2.png
Screenshot_20201223-070543.png

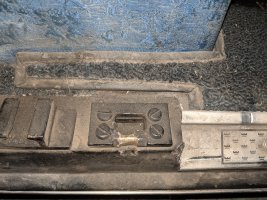
The second door question is about the brackets that lock the rear door in place. I noticed there is some wear on all of the brackets. My buddy suggested pulling them off and filling the worn area with weld and cleaning them up. The rear doors move about as much as much as the worn area in these brackets. I think this could be a pretty easy fix for most of the rattle I hear.
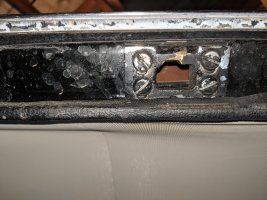
PXL_20201222_212737993.jpg
PXL_20201222_212727937.jpg

I'm finding it really interesting how S&S took stock parts used what the could and reworked everything else! Also I'm curious as to what the adjustable stops are for on the rear doors? I was thinking they are used to stop some flex while driving. I'm not sure how they should fit or if they need to be adjusted.

Sorry for all of the pictures! I just think they really help explain things more.
 
The 73 s&s i redid used a standard caddy profile for the door seals. You will eed to buy it in bulk as the doors are not the same. Steel rubber, metro , rubber the right way,fisk, usa parts and a few.ore sell it by the foot. I would suggest getting 100 ft. You will need at least 80 or a touch more to do the car. As far as building up the worn spots yes. The more you get into the car the mre you find they used a standard piece and modfied it to work for them.
 
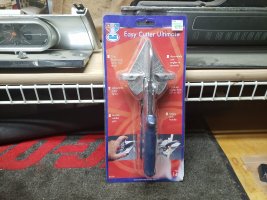
Cut a section of the existing rubber out to determine the profile of the rubber. Once you have it out, take the piece to your computer, and start searching the online catalogs for a matching rubber, or as close as you can find. Once you find one that looks exactly like your rubbers profile, or close to it, then check the measurements of the profile to see how close they are to your rubber seals. Once you determine the correct profile, then measure the 4 sides of each door that you will be using the rubber for, and add 10 or 15% additional for errors, etc.. The best way to make the corners of the door rubber, is to determine the exact angle of the corner, and using a hobby type of miter box, cut the rubber, and glue the corner together using Cyanoacrylate glue. Practice making the corners first before you start on the final work. Measure twice, and cut once. The gasket must be glued in place, and that is best accomplished using 3M Super Weatherstrip Adhesive in black. This comes in a 5 ounce tube, and the part number is 08008. You will probably need 2 or 3 tubes. Make sure to read and follow the directions for best results.

 
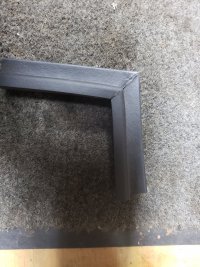
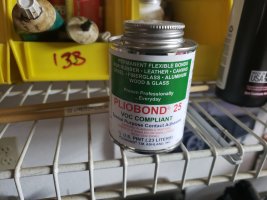
I have has good luck at cutting 2 sections and glue them with crazy glue to make a corner section if you need a 90 for a edge of a door. I glue that section in first and then glue the end of the run of weather strip to it and then glue to the door a foot or do at a time. Here is a pic of the glue i use , have had good luck with it. The corner pic was a test section , and was not used as with little experience I got better at making the corners and almost invisible when done correctly . If you also mark the outside edge of the old weather-stripping before you take it off , that gives you a glue line to apply and less clean up on the door. I found this at hobby lobby makes pretty good cuts . The stops are to adjust the closing tension on the doors. You need good weather-stripping before adjusting those.

20201223_135857.jpg20201223_135909.jpg20201223_140454.jpg
 
Now me it is of course use what is on hand. But but you will see the 3 of us use super glue for the courners and contact cement to attach it. I like the guerilla brand of super glue and professional grade weldwood contack cement And dental floss. Fallow the direction on what what ever glue you use. But when you cut your profile all you need it a slice that has not been distorted. Check the rear door agents the others as there are times it is different. As for the dental floss there are times you just can't can't get the courner to stick to its self. A x with the floss and a curved needle will keep it togather. At 4 to 6 bucks a foot you save what you can
 
Thanks for all of the information! It looks like I will be trying to find a good piece of weather stripping to use as a sample so I can match it. It's crazy how expensive something so simple can be. I guess because they probably only run small batches of less common types once a year, or less.

We use a 3M product at work for gluing foam protection pads on roller coaster trains. Once it cures you can't pull the seam apart! I can't think of the name at the moment. It sounds like it's similar to the the stuff Paul mentioned. I will probably use that since I'm already familiar with that!
This will definitely be a project for when it get warmer outside so the glue cures properly.

I will definitely be welding those brackets. To see if the doors will lock tighter.

Everyone has been so helpful here! It is appreciated!
 
People forget about rubber products when they talk about rebuilding things. But to replace the weather seals anti rattle strips on each door is a easy 200 bucks a door
 
I would suggest getting 100 ft. You will need at least 80 or a touch more to do the car.
You were really close with the 80'. I roughly measured around the front and rear doors and came up with roughly needing about 17' per door, 68' total without extra. I measured aound the entire front door. Across the top, rear and back of the rear door. Before I order I will use a string to get a more exact measurement then add an extra 10'-15' to be safe.

I didn't check the weatherstripping on the rear door to see if that's the same yet. When I looked at it the other day that seal only covered where the vinyl top was located. Not all the way around the door. That didn't seem right to me.

I did manage to get a good piece of seal. Near the locking mechanism on the front door.
PXL_20201230_222102706.jpg

I noticed at the front of the door near the wiper controls there is a larger piece of rubber that appears to be part of the seal. I'm not sure if that has a specific name or not or if there is a replacement for just that piece. I didn't want to go tearing too much stuff apart just yet since I don't plan on starting the doors until maybe late March.
PXL_20201230_211722771.jpg

In other news I went to fire it up today and the starter stuck on spinning. Turned the key off and kept spinning. I had to disconnect the battery. I checked it a few hours later and it fixed itself. I ran it while I measured everything. Shut it off. Went to start it again and it just hummed. Looks like I'll be replacing at least the solenoid before summer.
 
Suggest that you remove the starter, and have it serviced by a independent local rebuilder who will replace only what is needed. I don't recommend using auto parts store exchange units, because you have no way of knowing the quality. I removed the starter from my 1962 Chevrolet, and it was all original to the car. The shop that I use, cleaned up the original case, and installed new end bushings, brushes, turned the armature, and rebuilt the original starter solenoid. All the original part numbers and date codes are still correct for my car. Total cost for the rebuild was $75 parts and labor.

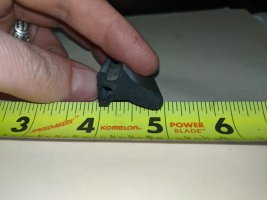
The door rubber that you have pictured is the original rubber that was used from General Motors. You can purchase rubber gaskets for the front doors from one of the rubber vendors to replace this gasket. You will need to order a 2 door sedan gasket, and will probable come up short in length. What you can do is to cut it in the middle at the bottom of the door, and glue in a piece of gasket material that matches. Speak with the company who's product you are going to be using, and explain what you are doing, and they might have some "filler" pieces that you can use to complete the front door project. The back doors are another project, and the rubber for the front doors might not be correct for the rear doors. The body builders did a lot of mixing and matching to achieve the finished product.

Stand the piece of rubber on a piece of paper, and do a tracing around the rubber for comparison to what you will see in the catalogs. Also post the picture of the the tracing onto this thread, and someone might recognize the product that you need from the drawing.
"You will need to order a 2 door sedan gasket" For what year, make, model?? Cadillac sure didn't build a 2-door sedan in 1972.
 
Just buy it in bulk it is easier to work with. You will discover that it is the standard weather strip for that year. Except pins or no pins. The aftermarket manufactures used the front foot or two of the factory door frame to marry there door to the factory cowl. So all the leading edges are factory. But the door is way bigger the the GM door. Factory used a set of nylon t pins to hold the rubber to the door. S&S glued theres. There is a price difference in the holes no holes bulk rubber. The extra you want is enough to redo one door. I would say get it now before the spring price increases.
 
Hi everyone! It's been a while since I posted. Started a new job and getting used to the commute and starting time difference! I'm looking forward to the new schedule 10 days on, 4 off with at least one weekend a month off during the summer. That should allow me to get a good amount done.

Unfortunately I haven't done anything with the hearse yet. It's been cold and we were getting snow every few days! Luckily the weather is slowly turning for the better.
 
I'm finally getting back to this project now that we are finally seeing spring like weather here in Pennsylvania!

I like the idea of buying the front gasket for another car and splicing to it. That way I can replace the big gasket area where the door and rear corner of the windshield meet. Would the 71-76 Fleetwood Brougham & Limo front door kit be the best fit for splicing?

Here is one issue I have found and am a extremely nervous about. I have a leaky windshield. I know it is pretty common. My biggest concern is the vinyl is in excellent shape and I do not feel or see any bubbling from the outside. The headliner has a few rips and tears so that will be replaced down the road. The last owner tried hooping the inside of the windshield. No luck. I do not plan to tackle this myself, I'd sooner let a pro deal with it. I am hoping that the windshield can be pulled and resealed without a situation. I'm worried as to what may or may not be there once removed. Any tips on that would be great.
 
Take the trim off on the inside. Sit in the car and have someone spray water on it so you can find the spot that is leaking. Most of them can be plugged from the inside with a dab of sealent .
 
I will try removing the trim and go from there. The previous owner laid a pretty ugly bead across the glass on the inside. I don't think the trim was removed to add the sealant. I did remove the screws a few months ago for the top trim and water really dripped out of those holes.
 
Standard trick. They either try it on the molding out side or in. The drip can be anywere it runs alone inside the moding and comes out were ever it is low..
 
I managed to make some progress the last few weeks now that the weather is nicer. I believe I fixed the starter issue. The harness that ran from the starter to the firewall had the fuseable links toasted and the other wires were stiff, brittle and the internal wires were corroded and exposed too. Probably why that starter would spin, or hum. I found a new harness (Starter Extension Harness #29010) at M&H Wiring Harnesses in CA for $50. I also replaced the positive battery cable and insulated the wires and started with the velcro fiberglass insulation. After a slow trickle charge overnight she fired right up! After warming up she fired still up instantly!

My mechanic found a used Quadrajet carb to replace the Edelbrock that's currently on it. It was pulled off of a 75 El Dorado with a 500. I ordered the rebuild kit, new float, filter and new choke pull off.

I also sent out my rear parking brake cables to Bruin Brake Cables and got two replacements for around $130 shipped for the pair plus about $12 to send them my original cable.

I dug into the leaky window a little more as well. The good news is that the rood does not appear to be rusty. The little 'bubbles" I felt under the headliner are mouse turds! I also found droppings in the rear storage compartments. Looks like I will be getting this cleaned and headliner replaced. It has holes in it anyway. Any advice on cleaning?

I'm finally ready to start on the door weather stripping, finally. I like the idea of ordering seals for another car then splicing extruded pieces to fill in the difference. Would one model be better than another for the front doors? Would the Fleetwood, Brougham, and Limo seal be the best match? I pulled rough measurements and made a sketch of the dimensions around the driver side door if that would be of any help.

For the rear (back of the coach) the weather stripping on the body appears to have been replaced and is in good shape. Should there also be weather stripping on the door too? There is a 1" wide by 1/4" thick, flat piece of across the top of the door and goes down each side about 6" and stops. That piece is peeling off and is in bad shape. Should that go all the way around the door? I'm pretty sure the locking pin needs to be adjusted. When the door is closed you can pull the door out about 1/4". I'm not sure if the door should have weather stripping or if I should try to adjust the door pin first.

If you made it this far I thank you!
 
Personally i would do bulk weather striping you want as few joints as possible. It sounds like some one has glued on some strips of foam on the back door. It should be the same as the side doors and put on the same way on the door. None on the body.
 
Here is an odd one and I am completely puzzled. I can't get the rear door open on the driver's side. The inner handle will not move up or down as if the door somehow locked or jammed. I pulled the trim off the doors to see the locking pins. Looking at the other door it appears the pins only need to move about 1/2". I thought I moved both the pins but the door still won't open!

I believe the outer door handles are strictly for appearance and seem to do nothing on either door.

With the raised platform there isn't much room to access the lower pin. Before I start pulling more apart I figured I would see if anyone else had this issue or I am missing something obvious.

Thanks again.
 
Its locked. There is still a lock on the striker plate. It can drop in a half way spot making the door inoperative. If you have the trim pad off reach in find the tab for the out side lock and move it. If the door doesn't open move it the other way.
 
Back
Top