Rocky has a new coach?????

Thanksgiving day I was out in the garage for awhile. I started to fit my power steering pump on the car. All I could do is chuckle a bit about what I had to cut out to make it if. On this car im going to run a ac and a alternator on the top side of the motor so I needed to keep it on the lower side. Oh well getting ready to head out to the garage for the day. I will work on getting it replated back up. Here is what I had to trim up for it. Well I guess im almost done cutting on the cross member.
 

Attachments

  • DSCN7240.jpg
    DSCN7240.jpg
    94.7 KB · Views: 400
  • DSCN7244.jpg
    DSCN7244.jpg
    97.7 KB · Views: 403
  • DSCN7245.jpg
    DSCN7245.jpg
    93.9 KB · Views: 400
I can't see you problem . why GM just had it drawn up, made some dies, programed the press and stamped one out. then some guy with a hang over mindlessly put the rivets in. they did in the hundreds a day that way.

but I'm like you solve one problem at a time. you might have to go back and redo something you did before but at least when you get done you can get a belt on with out pulling a motor mount and lifting the engine kind of stuff. the welds clean up and it's painted the average person just thinks you drop a different engine in it. :thumbsup:
 
well I got the cross member all boxed back in. And the mock block back bolted in once again and now im working on trying to figure out my accessories and my headers.
 

Attachments

  • DSCN7249.jpg
    DSCN7249.jpg
    89.5 KB · Views: 355
  • DSCN7250.jpg
    DSCN7250.jpg
    87.6 KB · Views: 346
  • DSCN7253.jpg
    DSCN7253.jpg
    91.5 KB · Views: 347
  • DSCN7254.jpg
    DSCN7254.jpg
    93.1 KB · Views: 347
  • DSCN7259.jpg
    DSCN7259.jpg
    92.5 KB · Views: 344
pretty

welds are so nice you should paint it with clear and let your handiwork shine through! like the pulley system also. ac comp and alternator up top. are you using a crate motor? maybe zz3? how aqbout trans? maybe 4l60e?
 
Yes I have a zz-4 motor, and had a th-400 rebuilt for it. I think the combo with the rear should be a pretty good high way cruzer.

As I started to fit the accessories I realized that my radiator in let is right where my alternator is, so call the shop that built it for me. They said send it back to them and the will change it and is going to add a trans cooler in it for me. Nothing like I said having to redo some stuff over again. But I guess that is the fun of re-engineering stuff.
 
Rocky, you are AMAZING! I wish i had a fraction of your talent, skill and know-how! And it was a great pleasure meeting you and seeing your shop this summer.
 
This build is awesome! Good fabrication. I'm going to steal a few of your ideas for my 57 M-M. I wish I was starting with a car half as nice as yours!
 
I got a visit from the ups driver today, I have to show some pictures of this eye candy I ordered up for my 58. Im very happy with the quality of these. These valve covers are pretty new to their line up. Using the 49 cad style script.
The covers are made for small block chevy's, it is machined on the top near the intake side one for the breather and the other for the pcv valve.
 

Attachments

  • DSCN7264.jpg
    DSCN7264.jpg
    92.9 KB · Views: 162
  • DSCN7265.jpg
    DSCN7265.jpg
    91.6 KB · Views: 176
this just also came by UPS, I guess that this will also be the next challenge to figure out what its going to take to get it mounted and working. This is the newest gen of the vintage air set up.

It is the gen IV magnum. It uses electronic servo motor doors, Bi level adjustment heat-cool, defrost. So when I get it dialed in I should be riding in comfort no matter what temps old mother nature throws at me.
 

Attachments

  • DSCN7261.jpg
    DSCN7261.jpg
    87.8 KB · Views: 246
  • DSCN7263.jpg
    DSCN7263.jpg
    93.8 KB · Views: 232
vintage air

had a 68 ranchero with 1st generation vintage air and had a problem and they sent new parts at no cost. good people. 190 miles west of me and got my parts overnight and NO cost. good company.
 
Rocky, Im really starting to consider the black valve covers for my 350 crate that's in my 49 S&S. Do they look like a high quality part, or a cheaper stamping. I was just going to go with the decal kit, but this looks much nicer.
 
John

Those valve covers are cast aluminum and look fantastic.

Definitely not a cheap stamped tin set.

Looking forward to seeing both cars & engines in MN in Aug 2014 with matching valve covers !

Darren

:thumbsup:
 
Rocky, Im really starting to consider the black valve covers for my 350 crate that's in my 49 S&S. Do they look like a high quality part, or a cheaper stamping. I was just going to go with the decal kit, but this looks much nicer.

These covers are sand cast, made very very well, I have a handful into them with the adapters from center bolt head to outers. But would recommend them for sure. Very good quality part. Also let them machine the covers for the pvc or breather if you need them. They get $40 a hole to do it, but they do a great job machining them.
 
here is the inside of the covers, you can see the baffles, and here is the machining for the pvc and the breather.
 

Attachments

  • DSCN7267.jpg
    DSCN7267.jpg
    95.3 KB · Views: 164
  • DSCN7268.jpg
    DSCN7268.jpg
    92.9 KB · Views: 166
  • DSCN7269.jpg
    DSCN7269.jpg
    92.8 KB · Views: 167
  • DSCN7270.jpg
    DSCN7270.jpg
    98.1 KB · Views: 166
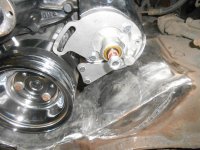
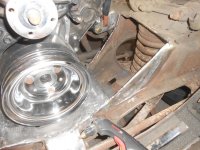
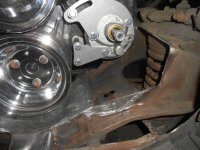
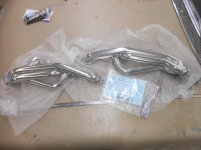
This week I received a few more pieces from UPS. I received my headers, from sanderson headers. They have a great selection of many different styles. I looked through and figured out what I wanted to order, had them ceramic coated. They look great, but if any of you guys know about headers. Just when you think they will fit. Usually not the case unless you message them some.

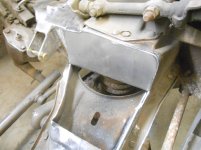
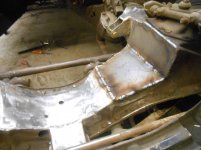
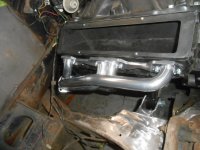
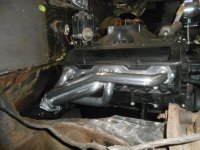
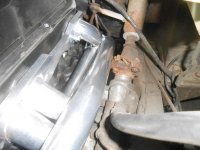
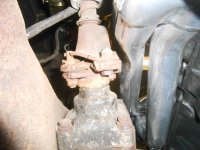
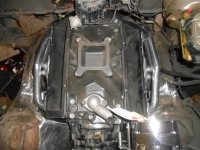
On my passenger side plenty of room, the drivers side I was great except that it hit the steering rag joint.. Dang it so meaning to say I had to collapse one of the tubes more then I really would of like to. But now it fits with about alittle better then a 1/8" of extra space. I tried to dimple it so the gasses still can flow smooth. Oh well but im really amazed how well the coating stuck on with having to do that. Here are the headers and the mods I did to make it work. One step closer to getting it ready to put the motor in for the last time. Im really happy to have the mock block, that is so worth its cost to do this fab work. I have had it in and out of the engine compartment so many times. And I think if I have once, I have hopped in and out of the engine bay 300 times by now.
 

Attachments

  • DSCN7274.jpg
    DSCN7274.jpg
    91.2 KB · Views: 114
  • DSCN7275.jpg
    DSCN7275.jpg
    90.7 KB · Views: 108
  • DSCN7288.jpg
    DSCN7288.jpg
    91.8 KB · Views: 114
  • DSCN7276.jpg
    DSCN7276.jpg
    88.9 KB · Views: 114
  • DSCN7280.jpg
    DSCN7280.jpg
    91.7 KB · Views: 116
  • DSCN7290.jpg
    DSCN7290.jpg
    94.6 KB · Views: 111
  • DSCN7284.jpg
    DSCN7284.jpg
    92.6 KB · Views: 113
Back
Top