You are using an out of date browser. It may not display this or other websites correctly.
You should upgrade or use an alternative browser.
You should upgrade or use an alternative browser.
Rhinecliff updates
- Thread starter Nicholas Studer
- Start date
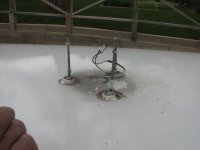
I have used the couplers a few times, when I wasn't certain that I liked the height of the skirt, and wanted to use a higher one. Makes for changing a beacon a simple process.
Kurt Arends
PCS Elected Director 2021-2024
What size are the rubber grommets that go through the roof? Anything unique about them?
They are not actual grommets, however, they are rubber washers. Originally, Federal supplied rubber washers that were thin at one edge, and thicker at the opposite edge, and you would used them to set the bolts so they were vertical. I have used rubber washers from the top and bottom, and flat steel washers top and bottom, so the roof metal was sandwiched in between the rubber and steel washers. Never had a leak, and was able to find all the parts locally.
Kurt Arends
PCS Elected Director 2021-2024
Couldn't you use fire wall grommets with a steel washer on top(outside) & bottom(inside)?
Shoulder washers
Take your pick
https://www.digikey.com/products/en/hardware-fasteners-accessories/washers-bushing-shoulder/583
Take your pick
https://www.digikey.com/products/en/hardware-fasteners-accessories/washers-bushing-shoulder/583
Couldn't you use fire wall grommets with a steel washer on top(outside) & bottom(inside)?
You could, however, that would require a larger hole, since there needs to be room for the grommet, and the 1/4" threaded rod to go through the center. You can drill a 9/32" hole in the roof, which will give you enough room to insert the threaded rod, install rubber washers with steel washers on top of the rubber, and then put nuts on the rod from top and bottom, and tightly sandwich everything together to create a stable and water tight assembly. I doubt that you will have more than $1.00 invested in the 6 rubber washers. The rest of the hardware will cost less than $5.00, i.e. the threaded rod, steel washers, nuts, and lock washers. No need to overly complicate a simple installation.
Shoulder washers made of nylon, fibre, or Poly Sulfide are all to hard to get a watertight seal on the roof surface. This is specifically why I specified using rubber washers. Now, had you posted a link to neoprene, that would be an acceptable substitute. Some might even think of using the rubber and steel Nutserts, however, they have a tendency to come out if there is any stress upon them.
And rubber has the long well known history of decomposing due to heat/cool cycles.
Personally, I'd either employ a razor blade to a grommet or swing by WEB Seal and see what I could grab out of the punchings bin, but I have that tremendous advantage. Then, I'd go with a generous coating of the miracle product GOOP to minimize water leakage potential. You could probably get a water tight penetration with just GOOP and a pair of fender washers as well.
The only drawback to GOOP is getting it off your hands. It beats hell out of RTV silicone, and the tube doesn't self cure due to humidity.
Nicholas Studer
PCS Elected Director 2022-2025
Years later, the long-missing dedication plaque to this ambulance re-appeared! During a downsizing move, a previous owner discovered it in a box in the garage and generously reached out to me. I suppose persistance paid off - this car now has basically all of its major original features! The permanently attached ones at least!
This ambulance was purchased on 12 January 1963 for a cost of $10,492 from Community Garage of Rhinebeck, Inc., the local Chrysler dealership. At the time of bid review - that included Superior and Eureka - the ambulance fund had $11,069. Of this, $8000 was a donation from Mrs. Astor. Mr. Allen Ryan donated $500, leaving just $2569 raised in over 3 years of "grassroots" fundraising efforts for the ambulance.
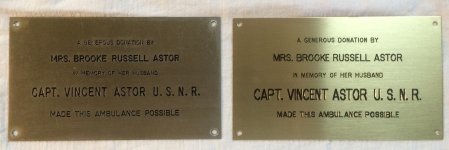
I had a copy made of the plaque by a local monuments/trophy company - just in case! They also refilled the original's lettering that had flaked out. The original is on the left, the new one on the right. They got pretty close and the price was extremely reasonable.
Which do you think should go on the car? It's more obvious in person - but the new one is a much richer brass without surface scratches. However, it of course is not the original! I am also concerned for galvanic corrosion, and not sure whether to use brass or regular/stainless steel screws in the original holes on the side of the car's roof.
Attachments
David Henry
PCS Member
Nick,
Where was this plaque mounted in the ambulance?
Where was this plaque mounted in the ambulance?
don't mix you metals. the left one can be easily restored to like new. a little sanding with progressively fine sand paper and buff. spray the letter black and wipe off the excess with reducer. the a hand buff to remove any left over paint. a coat of clear to seal it all . you have a extra either way to add to a picture for your wall
Tim Prieur
PCS Member
My vote, keep the original with the car.:thumbsup:
Nicholas Studer
PCS Elected Director 2022-2025
Nick,
Where was this plaque mounted in the ambulance?
IN? Inside would be boring.
don't mix you metals. the left one can be easily restored to like new. a little sanding with progressively fine sand paper and buff. spray the letter black and wipe off the excess with reducer. the a hand buff to remove any left over paint. a coat of clear to seal it all . you have a extra either way to add to a picture for your wall
No matter what I do - I'll be mixing metals between the plaque, fasteners, and steel roof. My choices are: 1. Use steel/stainless screws and thereby risk galvanic corrosion between the plate and fasteners. 2. Use brass screws and risk corrosion between the steel roof and fasteners. Luckily, brass is fairly mid-range to somewhat noble - but the roof is an unknown steel. Considering the screws would be deep in an oxygen/moisture-poor hole - I think the latter is probably safer. It'll look better besides. No one seems to remember the fastener type.
The one on the left is in decent shape - and the shop already filled the letters to like new condition. Planned to give it a quick buff and pondered clear-coating. The extra is out of paranoia for souvenir-hunters in circumstances when the car is left alone...
My vote, keep the original with the car.:thumbsup:
I think that's what I'm inclined to do. It looks decent besides - not new, but decent like it's approaching 55 years old...
Attachments
Last edited:
Years later, the long-missing dedication plaque to this ambulance re-appeared! During a downsizing move, a previous owner discovered it in a box in the garage and generously reached out to me. I suppose persistance paid off - this car now has basically all of its major original features! The permanently attached ones at least!
I always felt that he had the plaque, and I am happy to know that it has been reunited with the car.
This ambulance was purchased on 12 January 1963 for a cost of $10,492 from Community Garage of Rhinebeck, Inc., the local Chrysler dealership. At the time of bid review - that included Superior and Eureka - the ambulance fund had $11,069. Of this, $8000 was a donation from Mrs. Astor. Mr. Allen Ryan donated $500, leaving just $2569 raised in over 3 years of "grassroots" fundraising efforts for the ambulance.
I had a copy made of the plaque by a local monuments/trophy company - just in case! They also refilled the original's lettering that had flaked out. The original is on the left, the new one on the right. They got pretty close and the price was extremely reasonable.
Which do you think should go on the car? It's more obvious in person - but the new one is a much richer brass without surface scratches. However, it of course is not the original! I am also concerned for galvanic corrosion, and not sure whether to use brass or regular/stainless steel screws in the original holes on the side of the car's roof.
The original screws were brass, and I removed them because they would snag the towel when I dried the car after washing. They were in a medicine bottle in the glove compartment, and if you don't have them, then they might be somewhere in the garage, but I have no idea where. One more thing to keep looking for.
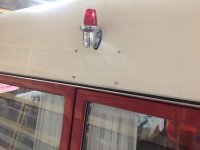
IN? Inside would be boring.The fine citizens of Rhinecliff thought it suitable to drill into the side of the ambulance's custom steel roof (sliced off a deadlined Sedan Delivery of some vintage, mind you...) under the side marker lights. When I got the car, there was just empty screw-holes there - learned from the current Fire Chief of Rhinecliff shortly after buying it from Paul that there used to be a dedication plaque there. Random posts on Facebook seem to indicate that was one of the memorable things on the car. I put some steel screws in the holes to close them up to the elements. Photo below.
According to Jack Pinner, the roof was hand made in the Pinner shop by their metal workers, just like the rear door. Jack also told me that they salvaged sedan delivery rear doors, but that was in the mid 1950's, when they were starting up, and they used them for the hearses. The back door on your car was custom made for the car, and the only thing that might have come from a sedan delivery are the rear door hinges. Back in that time period, all the body builders were masters at re-purposing parts from production cars.
The one on the left is in decent shape - and the shop already filled the letters to like new condition. Planned to give it a quick buff and pondered clear-coating. The extra is out of paranoia for souvenir-hunters in circumstances when the car is left alone...
I think that's what I'm inclined to do. It looks decent besides - not new, but decent like it's approaching 55 years old...
The souvenir-hunter doesn't live anywhere near you, and lucky for you, has been willing to reunite some of the purloined items back with the car. To keep the record clear, I am not the souvenir-hunter, but the cars 3rd owner, and Nick is the fourth owner.
The plack normally come with brass screws. So it stands to reason that is what it was put on with. The best way to minimize the electrolises is with a drop of anti seaze past in the screw holes. But your holding the original plack how bad was it.
Nicholas Studer
PCS Elected Director 2022-2025
I always felt that he had the plaque, and I am happy to know that it has been reunited with the car. The original screws were brass, and I removed them because they would snag the towel when I dried the car after washing. They were in a medicine bottle in the glove compartment, and if you don't have them, then they might be somewhere in the garage, but I have no idea where. One more thing to keep looking for.
Nope - not here! But, the local True Value had some suitable replacements amongst its massive selection of fasteners that will do until another "Eureka!" moment in your garage.
According to Jack Pinner, the roof was hand made in the Pinner shop by their metal workers, just like the rear door. Jack also told me that they salvaged sedan delivery rear doors, but that was in the mid 1950's, when they were starting up, and they used them for the hearses. The back door on your car was custom made for the car, and the only thing that might have come from a sedan delivery are the rear door hinges. Back in that time period, all the body builders were masters at re-purposing parts from production cars.
I can only say what Jack told me at the 2015 International Meet in Houston, TX. He indicated that most of the roofs were modified from sedan delivery vehicles, and that there must've been nothing but roofless sedan deliveries for a hundred miles around Memphis. I don't know how long that went on - but Jack seemed to believe this car was one of them.
The souvenir-hunter doesn't live anywhere near you, and lucky for you, has been willing to reunite some of the purloined items back with the car. To keep the record clear, I am not the souvenir-hunter, but the cars 3rd owner, and Nick is the fourth owner.
I don't suspect the second owner kept it intentionally. From what I gather, he pulled them off for concerns similar to mine when it was turned in to a shop for some rust repair.
My concern is at shows, travel, and the like. I brought this vehicle once downtown for some fire prevention display, and a gentleman actually hopped in the back within 5 minutes of me pulling up! Next time, we're getting some cones/rope! I am glad to have a spare of something that I didn't even know what it looked like before! The Mrs. seems to believe the more likely object of attention would be the Dutchess Co First Aid sign on the bumper though. No spare of that!
The plack normally come with brass screws. So it stands to reason that is what it was put on with. The best way to minimize the electrolises is with a drop of anti seaze past in the screw holes. But your holding the original plack how bad was it.
Yup - planning on some anti-seize in the holes. It's honestly not too bad on the plaque. Just cleaning up that area now.
Kurt Arends
PCS Elected Director 2021-2024
'63 New Yorker Parts Car
Here's a great '63 N/Y parts car for you Nick! Factory A.C. car.
https://kansascity.craigslist.org/cto/6188598532.html
Here's a great '63 N/Y parts car for you Nick! Factory A.C. car.
https://kansascity.craigslist.org/cto/6188598532.html
Attachments
Nicholas Studer
PCS Elected Director 2022-2025
Thanks Kurt! If I had a trailer, there'd be a fleet of vehicles in my backyard. 
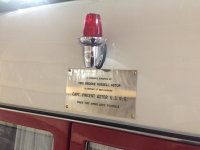
I ended up getting the original plaque re-plated. After cleaning off the dirt, it was apparent the brass plating had faded off in an irregular pattern - consistent with years of abrasive car washing and outside exposure. It just didn't look right on the car like that. Considering it would continue to be exposed to the elements at times, I think we made the right choice and I am quite happy with the result.
Brass screws and anti-seize compound on the threads, just in case.
Attachments
Kurt Arends
PCS Elected Director 2021-2024
The plaque wasn't solid brass?? That's odd.


