I've had for many years on the shelf a Federal 184 that I would now like to mid-roof mount on my Lifeliner. The skirt was modified to fit the contour of the roof from the vehicle it came off. It's not that noticeable but definitely not level. Anyway, there were no mounting brackets that came with it, and before I fabricate something I'm looking for some suggestions.
You are using an out of date browser. It may not display this or other websites correctly.
You should upgrade or use an alternative browser.
You should upgrade or use an alternative browser.
Federal 184
- Thread starter Dave McGowan
- Start date
It will be noticeable once mounted. What vehicle did it come from, and in which position?
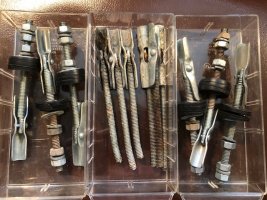
These didn't use mounting brackets; only a set of three nut and (long) bolt sets, as can often be found on eBay. A set of rubber grommets should be used at the roof line.
These didn't use mounting brackets; only a set of three nut and (long) bolt sets, as can often be found on eBay. A set of rubber grommets should be used at the roof line.
Kurt Arends
PCS Elected Director 2021-2024
Thanks guys, That's too simple.
Original instead of aftermarket mounting hardware--obvious enough.What are these then, Steve?
You do need to have a template so the beacon is properly facing when mounted. Mounting a beacon takes a lot of time, but it isn't that difficult. The time is in getting it properly located. I don't know if the stud spacing is the same as the Model 17 series sirens, but if it is, then Ed Renstrom has the template, and I am certain that he will share it with you. I use threaded 1/4" rod, flat and rubber washers, and a bunch of nuts to make my own studs. I usually make them longer than needed, and trim them to the proper height once the beacon is located on the roof. Just make sure that there is a zipper under where you want to mount it, and that you can get power to the beacon before you start the project. The beacon should be wired with 12 gauge stranded copper wire. When you are ready to start the project, let me know, and I can give you full instructions on how to do the job with minimal effort. The first one is always the most difficult, and the more you install, the easier it gets.
Depending on how steep the trim was re cutting the skirt to get it to sit flat is still possible. I do have a set of pictures i made up showing the process. If you send me a sd card I'll send them to you
One thing I don't see in this kit is the "scribing tool", and little "riser" pieces. If those are there, doing a mount job is your basic walk in the park.
I plan on trimming the skirt to make it level. Fortunately, the most I'll have to trim is about 1/4 inch at the deepest point of the skirt.It will be noticeable once mounted. What vehicle did it come from, and in which position?
These didn't use mounting brackets; only a set of three nut and (long) bolt sets, as can often be found on eBay. A set of rubber grommets should be used at the roof line.
About a 1/4 inch is the most I'll need to remove.Depending on how steep the trim was re cutting the skirt to get it to sit flat is still possible. I do have a set of pictures i made up showing the process. If you send me a sd card I'll send them to you
A very nice person gave me one of these mounting kits many years ago, and they are among the missing somewhere in my garage. I hope to find them before I pass away, because whomever cleans up the mess in the garage will have no knowledge of many of the things that I have stored in it. Since that time, I have learned to tag items with a description of what they are. Wish that I had started doing that 35 years ago. That is when I built the garage, and filled up a dumpster with a whole lot of things from the old house garage that I thought I would never need again, like my armature growler, and my Ford and Chrysler master key sets.One thing I don't see in this kit is the "scribing tool", and little "riser" pieces. If those are there, doing a mount job is your basic walk in the park.
Joe Eggemeier
PCS Member
Have you mounted the light yet? I have a simple way to do it.
I did mount it and it looks great. I trimmed the skirt to get it even and I used 3 toggle screws to mount it. 1 beer job!Have you mounted the light yet? I have a simple way to do it.
Tim Prieur
PCS Member
If possible, share a video Dave.
Joe Eggemeier
PCS Member
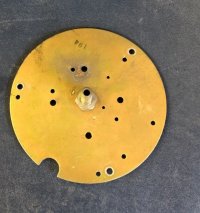
OK. I had a couple of ways to mount the light, or any almost any light, with ONE hole. Years ago, I used a lamp screw stem that is open in the middle where, when mounted in/on a lamp, the stem is attached to the bulb holder and the wire is run thru the stem, down the inside of the lamp, and secured with nuts. I did that with another type of roof light I had on my car. There is a detachable plate that can be used (see picture attached) I'm guessing for most lights. You attach the plate to the light via the 3 bolts that would normally go thru the roof. The "stem" I mentioned is in the middle of the plate (in picture). The stem can be of various lengths based on the light base. Drill one hole, place the light on the roof with the stem extended thru the roof, secure the light via the stem with a nut, run the wire(s) thru the stem. Done. I hope this helps others wanting to mount lights.


