What is the length of the quarter from the door opening to the bumper? The difficult molding to find is the rear garnish molding around the taillight. One year, one model only! Took me over a year to find one for my '62 BelAir.
You are using an out of date browser. It may not display this or other websites correctly.
You should upgrade or use an alternative browser.
You should upgrade or use an alternative browser.
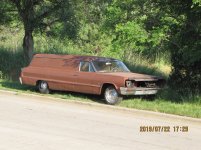
64 pinner service car
- Thread starter John ED Renstrom
- Start date
Kurt Arends
PCS Elected Director 2021-2024
What is the length of the quarter from the door opening to the bumper? The difficult molding to find is the rear garnish molding around the taillight. One year, one model only! Took me over a year to find one for my '62 BelAir.
Looks like 20 yards!! How in the world would you load a stretcher in th back of that thing with the way that gate opens??
There has been some
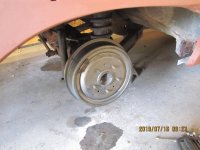
Pushing in and out on the car so the bumper has done a number on the back corner one also. Front eyebrows are damaged the same. I need at least one extra quarter one or two front door to make up for the streach. Haven't got to get out and check yet for any of them. But there has to be a few in Edgmont or Sturges. Sturges is out till after the rally. Elected to get new drums for the rear rather then mess with new ones so just waiting on them to get here.
Pushing in and out on the car so the bumper has done a number on the back corner one also. Front eyebrows are damaged the same. I need at least one extra quarter one or two front door to make up for the streach. Haven't got to get out and check yet for any of them. But there has to be a few in Edgmont or Sturges. Sturges is out till after the rally. Elected to get new drums for the rear rather then mess with new ones so just waiting on them to get here.
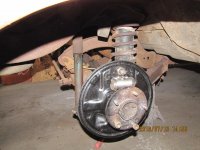
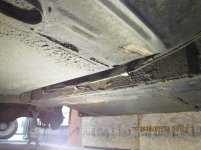
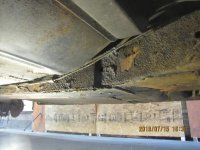
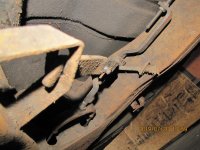
final getting enough stuff to get the brakes on the rear. did the rear lines yesterday. now I know those of you that live in the mid west, east cost do brake lines as a matter of course. but cars out here don't have that problem. I have never changed or even thought of changing a brake line for rust. the Pinner corp use copper tube and crush fitting to do there stretch. the copper was good. took a couple pictures under neath were they did the frame splice. nice job of it. we have the jack stands in the y at the rear. when I jacked the car up at the front A arm to get under the front it lifted the frame off the rear jack stand on that side
Attachments
That is how it was done on my 1963 Pinner Chrysler, and copper tubing held together to the steel tubing with compression fittings isn't considered safe or acceptable type of repair. I suggest that you either replace it with a full length of steel tubing, or at least cut it out, and double flare the steel tubing and install a new steel tube using the proper steel tubing fittings. There are no short cuts when it comes to safety.
Peter Grave - Deceased - 1938 - 2022
PCS Member
Just a note here Pennsylvania has a stiff safety inspection. I was a licensed inspector. The rule was copper tubing fails no inspection.
Standard splice in the day. The fuel line is done the same. As was the Armbruster. Never fear it's steel now.
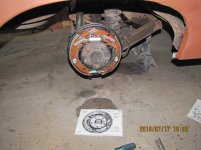
But the basket case has reared its ugly head with the brakes. Missing one piece here and there that you can only buy in a kit. The adjuster kit is kind of expensive. Buy the time i got new drums shoes small parts kit and the adjuster kit i would have been money to the good to run up and get a use rear end with brakes on it. But once you get started it's hard to back up..
But the basket case has reared its ugly head with the brakes. Missing one piece here and there that you can only buy in a kit. The adjuster kit is kind of expensive. Buy the time i got new drums shoes small parts kit and the adjuster kit i would have been money to the good to run up and get a use rear end with brakes on it. But once you get started it's hard to back up..
final got brakes on the pinner. all 4 wheels will now lock up is you stomp on the peddle and the rears lock up with the e brake. don't know how long it's been since they have done that but they work now. i fill the rear end with grease before we move it back out. and get the 96 back inside. tightening all the bolts back up on the heavy Iron was not fun either. I had to brake out the big metric set to get that mount for the cross bar. . hint if your dealing with rusty stuff and the standard set will not stay on try the metric
Attachments
While you are under there, you might want to add new bushings to the panhard bar. Just be careful not to damage the bolt, since the steel sleeve in the old bushing has a habit of rusting itself to the bolt, and the bolt isn't available. Also, if you want it to ride correctly you should change all the bushings on the rear trailing arms. The panhard bar allows the rear to move right and left as the car goes down the road with the up and down movement of the car. You really should get the 1961 Chevrolet service manual along with the 1964 Supplement.
It will need new bushings as the sleve is missing. But right now the big thing was the peg was half off. As was one of the trailing arms. So right now its make sure i don't loose any heavy iron while we are getting it running. As the drive line is out and cross members not all bolted in the most important
Thing was get the E brake to hold. What way we can't loose the car over the hill.
Thing was get the E brake to hold. What way we can't loose the car over the hill.
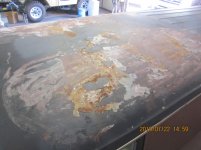
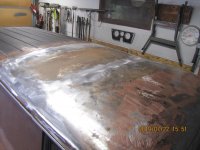
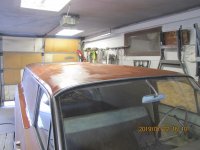
we have brakes need to set up the park a little but it will hold. so finished cleaning up the roof and covered it in red lead and run it out. we have stuff to finish before we do more on it. besides I want my S&S inside
Attachments
Bill Marcy
PCS Member
You are really making progress Ed! It is nice to see cars being saved, that were so close to extinction.
Kurt Arends
PCS Elected Director 2021-2024
She shows all of her sins now!
Peter Grave - Deceased - 1938 - 2022
PCS Member
Ed You got a big job smoothing the right 1/4 ahead of the wheel opening. You can sure tell it started its life in New York.
The other man put a patch panel justin front of the
Wheel. He is 2 inches low in th rear. The wadded filler from it to the door. It never been worked down. Who knows what is under there. The left side is still original the rust worm got it behind the wheel the inside panel of the rocker shows its origin. Small spots on the outer corner of the floor pans is about it for rust. The inside web of the hood is holy also. Found one car in a yard in rapid a 2 door post. Got some trim still on it but we will need more. You got any 64 Biscayne trim around need both sides. Also the top of the tailgate trim pad. The covered the end gate with a stainless steel piece cut to fit. But my guess is they reused the top steel piece to finish it off . That is missing also.
Wheel. He is 2 inches low in th rear. The wadded filler from it to the door. It never been worked down. Who knows what is under there. The left side is still original the rust worm got it behind the wheel the inside panel of the rocker shows its origin. Small spots on the outer corner of the floor pans is about it for rust. The inside web of the hood is holy also. Found one car in a yard in rapid a 2 door post. Got some trim still on it but we will need more. You got any 64 Biscayne trim around need both sides. Also the top of the tailgate trim pad. The covered the end gate with a stainless steel piece cut to fit. But my guess is they reused the top steel piece to finish it off . That is missing also.
Kurt Arends
PCS Elected Director 2021-2024
Get me a list tonight, Ed. I will be at Purkey's tomorrow morning. Probably won't get back down there for another 3 months or so.
Short list the side trim off a Biscayne. Both dides complete and the script the car is just shy of 20 feet. With the front fender being the short one. The rear quarter having the pointed end in the rear.I'll get on the computer and post a picture of the shape of the moldings. The two door post is the longest one. The front doors are off a 4 door car. Front fenders are the same on all the body styles offered in the Biscayne. Close as i can figure the rear off the two door post the then two front doors and the two fenders would be what they used. But if we can come up withany combination that includes the front and rear ends that measer around 18 feet we can cut and splice to make it fit. Ihave found 6 of this body that i can get parts off from if we need any other front end pieces off from. The only biscayn is a Canadian one that trim other then the script is differet then and others.
Here are few quick searches on Craigslist.
I don't know much about the difference between models and years, but these might help.
https://minneapolis.craigslist.org/dak/pts/d/dundas-1964-chevrolet-impala-parts-ss/6937438401.html
https://chicago.craigslist.org/nwc/pts/d/1964-chevrolet-biscayne-parts-for-sale/6954699078.html
https://chicago.craigslist.org/chc/pts/d/chicago-impala-wagon-misc-parts/6960412930.html
https://orlando.craigslist.org/for/d/casselberry-1964-chevrolet-impala/6942186483.html
https://greenville.craigslist.org/pts/d/gray-court-and-65-chevrolet-impala-and/6943323911.html
https://sacramento.craigslist.org/pts/d/red-bluff-1964-chevy-biscayne-station/6941521771.html
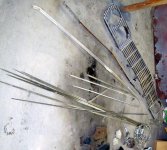
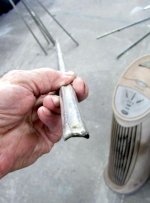
here is the trim style we need. what Pinner did on the upper side was take the 3 different lengths of quarter panel spears and use them for the streaks after the wreath. we have all 6 of them. each about 3 inches longer the the other. so I'm sure thee are different lengths of quarter molding . some how in this mess I have a SS trunk and hood molding. but all the blank panel and the pinner script is there. the other shop will give you the profile of the molding there are about 1/2 in wide with a half moon center. teh curved ind is eather flat or tapered depending on whis door and end your looking at.
the Belair is flat and over a inch wide the impala is flat about 2 inches wide on top and has white inset. comes over the top of the fender around the quarter and up the crown of the bottom body line at about the with of the belair.
the other thing I'm desperate for is the inside filler panel off the end gate. it would cover the inside top between the glass and the trim pad. no picture at all but rumored that 61 threw 64 would be the same.


