
You might show then the bumper broke down. It's normily a size thing with the smaller platers. A regular bumper takes a set of large tanks and a lot of room to buff. The rear would be a number of small.pieces that they might be able to do.

You are using an out of date browser. It may not display this or other websites correctly.
You should upgrade or use an alternative browser.
You should upgrade or use an alternative browser.
1976 Superior 54XL Restoration Log
- Thread starter Jean-Marc Dugas
- Start date
Jean-Marc Dugas
PCS Member
Today was Unity day. I installed a pair of C6 Unity spotlights to match the original set-up. The one on the Driver's side went on without a problem, the one of the passenger side is a combination of parts from various spotlights from my parts bin. When all was said and done, the shaft for the driver's side is about an inch too long. It does not affect its operations, but it could be

 a little shorter inside the car.

I did not have the proper locking collar for the interior shaft of the lights. somehow I thought to look in the ashtray and guess what? The proper angle rubber inserts and locking collars were in there! I wonder of Bruce left them there when he installed the previous dual head Unity lights when he had the car!!

a little shorter inside the car.I did not have the proper locking collar for the interior shaft of the lights. somehow I thought to look in the ashtray and guess what? The proper angle rubber inserts and locking collars were in there! I wonder of Bruce left them there when he installed the previous dual head Unity lights when he had the car!!
You lucky dog. I usaly only find one.
Jean-Marc Dugas
PCS Member
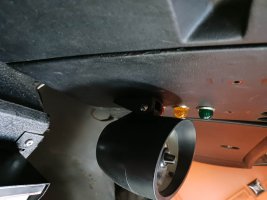
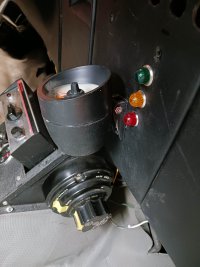
Now is the turn to move the tachometer to its original location. My guess is that the car was equipped with a tachometer because of the manual throttle control to allow for high idle when parked. This way the driver could idle the car at a predetermined RPM when parked.


I designed the base for the tachometer with Thinkercad and after printing a few prototypes I was happy with the final product.


Here is the tachometer back in its original location using the same mounting holes as with the original base. We are now one step closer for the car to be done!


......and yes, it needs a good cleaning......
I designed the base for the tachometer with Thinkercad and after printing a few prototypes I was happy with the final product.
Here is the tachometer back in its original location using the same mounting holes as with the original base. We are now one step closer for the car to be done!
......and yes, it needs a good cleaning......
Attachments
Philip Scanio
PCS Member / Super Site Supporter
Looking good. Why is there a throttle on a modern car?
We used ours (only occasionally) at extended scenes for increased cooling and amperage.Looking good. Why is there a throttle on a modern car?
Raise the engine speed when sitting still. Keep the AC running and the battery charged. Now tell me whwt is mordon about a 1975 car
Jean-Marc Dugas
PCS Member
Flooring template ready.

Jean-Marc Dugas
PCS Member
Oups.......


Moma said there would be days like this
Nothing that some solder, tape, and patience wouldn't fix. I am dealing with a slight parasitic draw on my Chevrolet and only wish that finding it was as easy as fixing some wires.
Jean-Marc Dugas
PCS Member
The project goes better if you don't tear it up trying o fix it. But this old chevy I'm working on things are in layers. You go to patch something and you have to patch 2 things under it first.
Jean-Marc Dugas
PCS Member
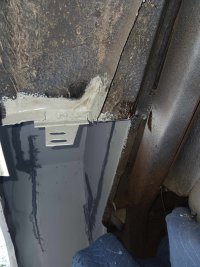
I have been working on the rear driver side wheel well on / off for the last couple of weeks. I finished welding on the patches I started last year, used the wire wheel to remove all of the old tar that was on the wheel well, primed it, applied seam sealer 2nd coat of primer, 2nd layer of seam sealer and 3rd coat of primer before applying the first coat of rock guard. I am a little paranoid of water getting in on that side of the car since that is where the cabinets are and once they are back in they are not coming out to check for water.
Spot welds & grind, more spot welds & more grinding. I am always afraid that I will grind off the welds and thin out the sheet metal.

Next step was to grind all of the old tar and prime the entire wheel well and apply seam sealer. total of three coat of primer and 2 coats of seam sealer.


Finally two coat, maybe three of rock guard.


Spot welds & grind, more spot welds & more grinding. I am always afraid that I will grind off the welds and thin out the sheet metal.
Next step was to grind all of the old tar and prime the entire wheel well and apply seam sealer. total of three coat of primer and 2 coats of seam sealer.
Finally two coat, maybe three of rock guard.
Attachments
Jean-Marc Dugas
PCS Member
I also had to repair the rear fender skirt bracket which was rusted out where it connected with the wheel well. I removed the rusted portion and spot welded it to a piece of angle iron which I spot welded to the wheel well. All and all it is very solid and should last for many years to come.


Tim Prieur
PCS Member
J-M, you must have graduated from the "Ed Renstrom School of Professional Car Restoration". Well done!
Jean-Marc Dugas
PCS Member
J-M, you must have graduated from the "Ed Renstrom School of Professional Car Restoration". Well done!
Thanks Tim! I wish I knew 1/4 of what Ed knows. I’m picking at it little by little, learning as I go.
There are days i wish i knew what i know. Really no need to grind the welds flush in there. Just knock the heads off to be sure you got it stuck, prime and seal. The big step most leave out is the seam sealer. One of the best buys i ever made was a gl of brush on under coating from JC Whinty. Took me years to us that up. It might surprise you how much quieter it runs down the road with them coated this way.
Jean-Marc Dugas
PCS Member
I started with the tube seam sealer but moved to the brush-on soon after. Same with the rock guard, I used the spray stuff on the passenger side, but the brush-on on the driver's side. I do not think that I will go back to using anything but the brush-on versions of these 2 products for most of the rest of this restoration.The big step most leave out is the seam sealer. One of the best buys i ever made was a gl of brush on under coating from JC Whinty. Took me years to us that up. It might surprise you how much quieter it runs down the road with them coated this way.