the superior pontiac gets its parts back

Rocky Fluegge

PCS Member
well i have been working on the pontiac. Right now its getting its starter rebuilt. I started to add some of the parts that have been taken off the car to give it, its identity back again.

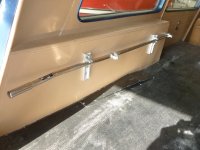
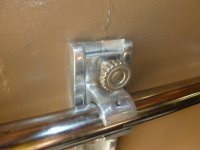
Last year at the international meet i bought a cot bar to put in my 49 cad that needs one. Well i decided to put it in the pontiac. I will have to get another one for the cad. My cot bar is also missing one of the set screw locks, i could use one if any one has one they want to sell. I will post a pic of what im missing.

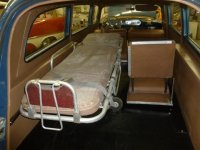
I got the cot bar mounted and dug into my gurnees and put one in the car now when people look at it. They now have a idea what the car is. Once i get the lights on it that will help.

Here is the little progress so far.
 

Attachments

  • 56 pontiac gurnee 62 chrysler 300 003.jpg
    56 pontiac gurnee 62 chrysler 300 003.jpg
    96.1 KB · Views: 310
  • 56 pontiac gurnee 62 chrysler 300 001.jpg
    56 pontiac gurnee 62 chrysler 300 001.jpg
    89 KB · Views: 312
here is what im missing one of. If any one has a extra that they would like to sell i just need one thanks
 

Attachments

  • 56 pontiac gurnee 62 chrysler 300 004.jpg
    56 pontiac gurnee 62 chrysler 300 004.jpg
    82 KB · Views: 307
A couple of hours with Mothers aluminum polish, and that gurney will look better than the day it was originally delivered. Once you have it polished, then give it a good coating of Collinite Fleetwax. It is the best wax that is out there. It is used on boats and aircraft.
 
Cot bar

Rocky, did you have holes already in the rear compartment side wall where the cot bar used to be mounted or did you use the hole pattern from the cot bar mounting brackets? Reason I ask is that I have measured hole patterns in the brackets and they range from 1 1/4 spacing to 1 3/4 spacing up to a 2 inch spacing between holes. I need either a set of brackets for the 1 3/4 spacing pattern that I already have drilled in the 69 combo of ours, or drill a new set of holes next to the ones already there that are in the coach. What would you do? We are starting to restore the back end of the coach pictured which came to us stripped out in the rear.
 

Attachments

  • Pictures of the 1969 Sovereign.jpg
    Pictures of the 1969 Sovereign.jpg
    95.8 KB · Views: 303
Set screws

The cot bar I have has a set screw that is an allen head with a cap style collared with a coin knurled edge around it. I could see using a recessed set screw both likely found at the hardware store. The allen looks like an aircraft grade screw. Silver colored.
 
FYI if interested,those are unscrewed regularly and adjusted,due to the fact the stretcher is one height but when transporting an incubator they were higher or lower than the standard stretcher,we use vise grips for the knurled knobs because some folks try the iron-man tightening method,just for your info..
 
Rocky, did you have holes already in the rear compartment side wall where the cot bar used to be mounted or did you use the hole pattern from the cot bar mounting brackets? Reason I ask is that I have measured hole patterns in the brackets and they range from 1 1/4 spacing to 1 3/4 spacing up to a 2 inch spacing between holes. I need either a set of brackets for the 1 3/4 spacing pattern that I already have drilled in the 69 combo of ours, or drill a new set of holes next to the ones already there that are in the coach. What would you do? We are starting to restore the back end of the coach pictured which came to us stripped out in the rear.
Mike the holes were there i had to enlarge them alittle bit from the original screws. The steel on the well's is very thick so when i drilled them i tap them with threads, screwed them, in but still put a nut and lock washer in the wheel well.
 
Mike when you get the brackets for the bar i would lay it over the holes and use one of the holes and just redrill the other. Put a little bit of sealer of some sort in the holes you are not using.
 
A couple of hours with Mothers aluminum polish, and that gurney will look better than the day it was originally delivered. Once you have it polished, then give it a good coating of Collinite Fleetwax. It is the best wax that is out there. It is used on boats and aircraft.
Paul that picture was befor i scrubbed it up it really cleaned up well, i have not polished it yet. The buckle's are little rusty on it. Im trying to hook up with one of the guys in my car club tonight for him to make me a new pad for it also.
 
Don't bother with a new pad, wrap that one with a sheet, and it will look like it should if it were still in service. Ask one of your EMT friends to get you some hospital sheets, and to show you how to make it up.
 
Don't bother with a new pad, wrap that one with a sheet, and it will look like it should if it were still in service. Ask one of your EMT friends to get you some hospital sheets, and to show you how to make it up.

I wish I had a fitted sheet for one too. Right now Im using a single size bed sheet from Wal Mart. I just have all the extra tucked under the mattress.
 
Just a hint put a full sheet on the frame minus the matress,put the matress back on with your blanket on top folded to fit and just cover the top,now fold the sheets up on each side and turn back at 4 inch pleats,tuck the tops under the matress, that was our summer stretcher make up, looks sharp for shows..:smileflagcan:
 
Back
Top