Master Cylinder Failure

Paul Steinberg

PCS Life Member Past President 2010-2012 2020-2024
Staff member
Super Site Supporter
While driving my 1969 ambulance last Friday evening, the master cylinder suffered a catastrophic failure. Fast thinking and knowing what to do, save the car from disaster. The following pictures and text will show what happens to your braking system when regular maintenance is not performed. This job was on my list of to do items once the car came back from Ed painting it, however, it was moved up to the top on Friday evening.

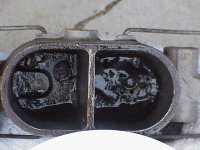
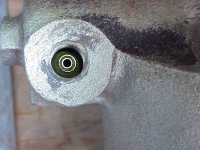
In the first picture you can see the "mud" that is at the bottom of the cylinder reservoir, as a result of not having brake fluid changes every 2 years. Brake fluid is hygroscopic, which means that it will absorb the moisture in the air, and the fluid will degrade as more moisture is introduced into the system.
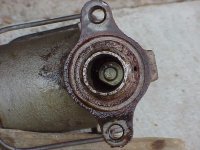
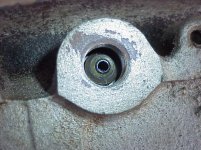
In picture 2, you can see the rust around the outer edge of the rear of the cylinder, indicating that this master cylinder has been leaking past the seals for a while now. Also, in this picture, I have removed the rear piston assembly that operates the rear brake cylinders and shoes.
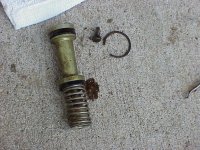
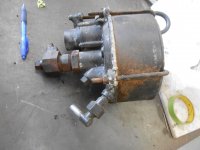
In picture 3, you can see the rear piston, and if you look carefully at the rubber cup next to the spring, you will see that the rubber cup has some material missing on the edge. This is what caused the rear brakes to fail.
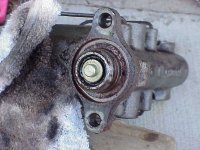
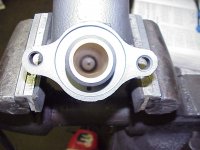
In picture 4, you can see the front piston after I used compressed air to dislodge it from the cylinder bore, where it was stuck "in the mud". I was careful not to use too much air, since I feared that it might come flying out, and get damaged, in case it needed to be reused.
 

Attachments

  • MVC-006L.JPG
    MVC-006L.JPG
    67.5 KB · Views: 411
  • MVC-007L.JPG
    MVC-007L.JPG
    80.6 KB · Views: 415
  • MVC-008L.jpg
    MVC-008L.jpg
    103.9 KB · Views: 399
  • MVC-009L.JPG
    MVC-009L.JPG
    86.1 KB · Views: 413
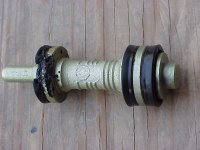
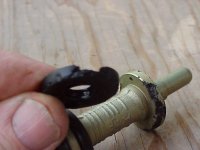
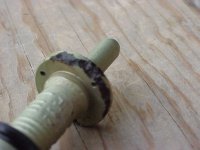
In this next series of pictures, you can see the rubber from the front piston and how deteriorated it is. You also can see the effect that the moisture in the brake fluid has attacked the metal of the piston at the rubber cup. This is the part that caused the failure of the front braking system. I believe that the rears were marginal, and when the front system failed, that the rears were not getting enough fluid pressure to activate the rear brake shoes, resulting in a total failure of both systems. Please note the two rubber cups that are at the right hand end of the front piston. These two cups are what separate the two systems inside of the cylinder bore. These two rubber cups are what saved the car from a major disaster. I will explain how later on.
 

Attachments

  • MVC-011L.JPG
    MVC-011L.JPG
    68.6 KB · Views: 408
  • MVC-013L.JPG
    MVC-013L.JPG
    42.4 KB · Views: 380
  • MVC-014L.JPG
    MVC-014L.JPG
    48.9 KB · Views: 390
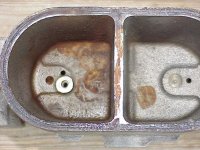
In the top picture, you can see the reservoir is now cleaned, and that the rust stains on the bottom of the reservoir indicate where the concentration of water was. This damage was a long time in the making, and it is interesting to note that there was no indication of any brake problems prior to the failure. In the next two pictures, it shows the front and rear ports that the brake lines screw into. In the first picture, you can see 2 distinct lines. This port is smaller than the rear port, however, it doesn't show in the pictures, because I was trying to show detail, not size. The front port has a copper insert that restricts the amount of fluid that can go to the front brakes, in relationship to the amount of fluid that can go to the rear brakes. This "modified" port is what keeps your car from nose diving when you apply the brakes. It allows the rear brakes to engage to a larger degree before the front brakes are engaged. This is what makes a Commercial Chassis master cylinder unique to its application, along with other internal porting within the cylinder itself.
 

Attachments

  • MVC-006L.jpg
    MVC-006L.jpg
    98.2 KB · Views: 377
  • MVC-008L.JPG
    MVC-008L.JPG
    86.6 KB · Views: 371
  • MVC-009L.jpg
    MVC-009L.jpg
    101.2 KB · Views: 372
Today was the day of reckoning, because I had to determine if the master cylinder was salvageable for use, or had to be bored and sleeved. After spending considerable time honing the cylinder, it became evident that the pits were too deep to be honed out, and that it would have to be bored and sleeved. Called Sierra Products in California to find out how long it would take, and was greeted with the message that they have closed shop and retired. Then the search began to find another shop that did brass sleeving. I did find one in New York, called Apple Hydraulics , and shipped my cylinder off to them. They promise fast turn around, and reasonable rates. I will let you know what I think of their work, once it comes back. In the meantime, someone has offered me a "loaner" to use. Not sure if I am going to use it, but it is an alternative if mine is going to be gone for a while. My next project will be to pull the front calipers and examine them. Chances are, since the front half of the master cylinder is badly pitted, the moisture has already done damage to the caliper cylinder walls also.
 
New MC

So Paul,
Are you saying that the MC's that are still available at RockAuto,Napa etc are not the same quality ??:eek:
Please advise why you are going through the trouble of having yours machined etc....
Maybe a dumb question,but I would like to know before I buy a spare for the 70 and 72...
Thank you :)
 
/ The part that is listed, isn't the correct part. The 1969 & 1970 commercial chassis master cylinders are alike, and are not available in the aftermarket. I haven't researched the other years master cylinders, so I can't comment. I use old parts books for part numbers, and see if there is a different part number listed for the commercial chassis part, before accepting what the modern parts book say is correct. I have found many discrepancies, when it comes to brake and suspension parts. Cadillac engine parts are almost always the same across the board, between a De Ville and a Commercial Chassis part.
The rebuild kit is the same for the 1969 / 1970 Cadillac as the 1969 / 1970 commercial chassis car, however, the basic casting is bored differently internally, and the brake lines attach on the opposite side. There are also some other subtle differences that I don't need to explain, because it isn't something that you can change. The most common "old wives tale" is that everything is the same as "some" GM truck. This couldn't be further from the truth. Even Pontiac and Oldsmobile's that were used for commercial car building didn't always use parts from their own division, in manufacturing the chassis. I know of a person that owned an Oldsmobile, and when he needed a differential part, the Olds part was wrong. It turned out that the differential was from a Buick. Finding the correct part requires research, and never trust the modern parts catalogs to get you the correct part. Sometimes the part is the same as a De Ville, and the catalog will say that it doesn't fit the commercial chassis, which it will. This is where knowledge and experience come into play. That is why I document as much of this as I do, since I will not always be here to give advise, and in the future, someone else may benefit from my life lessons.
 
Paul i did use a Mc that i bought for my old 73 in my 69.. It has been in there for several years and i have not had a problem with it.
 
Might wanna contact John Burchfield.....I think he has a few new 69-70 CC Master Cylinders new in the box.....I cant remember how many I sold him.:rolleyes:
 
Wow,Paul, I'm doing my master cylinder on my 55 pontiac right now also. I had a very unusual condition that in all my years of old cars has never happened. On mine, after I drove it, the brakes would begin to drag and nearly lock up by the time I got it home. The pedal would be at the very top and as hard as a rock.I bled the system several times and the same thing kept happening. I then tried changing both front flexible brake hoses and removing and cleaning the re-apportioning valve and still the same. I then decided it must be the master cylinder so I bought a kit and removed it(not the most fun job down under the floor). When I took it apart I found that it had been rebuilt before at sometime and the spring that was put in had a bright red coating on it and evidently the brake fluid caused it to deteriorate and I had little red particles clogging several places in the unit(it is the old single reservoir type). I finished it today and re-installed it but haven't bled the system and tried it. Any way, I hope that solves my problem. For some reason the pressure would stay in the line and not return to the master cylinder...We'll see..
 
the rubber line collapsing inside will lock one up. had that happen on both my jeep and the 52. all the result of sitting for a long time and not being used. man I'm glad that did not happen about half way up that loading ramp of the hauler. one never know just how lucky they are every day. good maintenance will help but Paul has not had this one in his possession. it does kind of make the swap over to double a moot question. I always thought both side could not fail.
 
Sorry to sound like a broken record, but....

This is why I use DOT 5 brake fluid.

To expand on Paul's statement, DOT 3 brake fluid is glycol-based and draws moisture from the air. If you drive your car daily, the brakes get hot enough to evaporate some of the water. The rest will remain emulsified from the constant agitation of multiple brake applications.

However, if your car sits parked most of the time the water in your brake system will separate and settle to the bottom of the master cylinder and wheel cylinders. Damage is imminent, and most of us discover that damage the hard way- which usually involves a change of underwear.

DOT 5 brake fluid is silicone-based and will not draw moisture from the air. You can leave your car sitting for years with complete confidence. It's important to purge the system completely when changing over as the two fluids are not compatible. I found a guy in Hemmings Motor News that sleeved my cylinders in stainless steel, then did a complete system rebuild.:beatdeadhorse5:
 
Since I bought my 57 Pontiac superior it has had sticky rear brakes. Well just as I went to put it away in fall they failed. Fortunately it was in my drive way. It was the hydro vac system that failed.
I just sent that out and had it rebuilt. and put a new master cylinder, and all new rubber hoses. I also got wheel cylinder rebuild kits but that all looked great so I left them alone. Finished it up last night. The old poncho rolls and stops like it should again. Here is the old hydo and I can take a picture tomorrow of the rebuilt unit.
 

Attachments

  • DSCN5361.jpg
    DSCN5361.jpg
    87.6 KB · Views: 176
The old master cylinder was sleeved with a brass insert, and I installed new parts into it today. It is now back on the car, and the brakes stop the car. I intend to rebuild everything, so I know it will be reliable and I shouldn't have to worry about it for a long time to come.
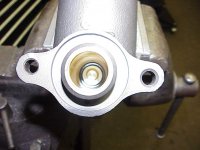
Picture 1.. Looking into the bore with the new brass sleeve
Picture 2.. Looking into the bore with the front brake piston installed.
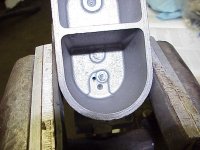
Picture 3.. Looking into the reservoir, showing the small screw that keeps the front piston from moving out of place.
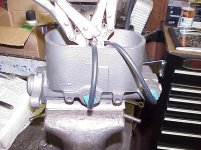
Picture 4.. Bench bleeding the master cylinder prior to installation in the car.

When the sleeve was installed, they removed the flared seats that the brake lines press against when you tighten the tubing nuts. I had to reinstall new ones that came with the master cylinder kit. I guess that is why the kit costs $35! To install them, I used a piece of steel brake line, and drove them home with the tube and a hammer.
 

Attachments

  • MVC-001L.JPG
    MVC-001L.JPG
    66.5 KB · Views: 129
  • MVC-005L.JPG
    MVC-005L.JPG
    61.2 KB · Views: 129
  • MVC-006L.JPG
    MVC-006L.JPG
    80.6 KB · Views: 129
  • MVC-007L.jpg
    MVC-007L.jpg
    98.5 KB · Views: 129
Details

Did Apple Hydraulics end up doing the work? How much did the entire process cost you including S+H and the master cylinder kit to reinstall the flared seats. Did you take any pictures of the flared seats after you installed them? Any part numbers or kit numbers you can share? With two 1969 coach's in ownership these are the kind of operations to get familiar dealing with. Thanks, for the crash course. Apple Hydraulics? Certainly did do a fast turn around.
 
The bore and sleeve job was $95, plus priority mail shipping. The kit came from a local auto parts store in a no name box. Brake bleeding kit, used from previously purchased master cylinder. The piece of metal brake tubing had to be custom made by an experienced machine operator, and was extremely expensive... about $1.00. Knowing how to put it all back together correctly, and work..... priceless.
If you drive your car on a regular basis, and change brake fluid every two years religiously, you shouldn't ever need to have a master cylinder sleeved. It is only because my car sat for over 10 years, without any maintenance, that the cylinder became so pitted that it needed to be sleeved.
 
Back
Top